


Topic outline
-
Photography is the art, application, and practice of creating images by recording light, either electronically by means of an image sensor, or chemically by means of a light-sensitive material such as photographic film.
No matter the brand or price tag, cameras all work in roughly the same way. Understanding the simple mechanics of how cameras work will help you get the best possible results out of yours.
But before you head out to start taking photos, you need to understand the six essential elements involved in recording an image.
Understanding these requirements, regardless of whether you’re shooting on a DSLR, compact camera or iPhone, will make your photography so much better. These requirements are:
- Light: Light is an essential part of any image, and it comes in many different types. How we use this light is important.
- Subject: The subject of an image is the person, object or scene being photographed. The composition of an image should leave the viewer in no doubt about the subject.
- Optics: This refers to lenses, which are used to focus the light and capture an image.
- Aperture: Aperture controls the amount of light that reaches the recording medium in your camera. It also controls the depth of field (the range of sharpness range either side of the point of focus).
- Time: Time relates to the shutter speed and how long the recording medium is exposed to light.
- Medium: The recording medium is what records the image. This used to be film, but is now usually a CMOS or CCD chip.
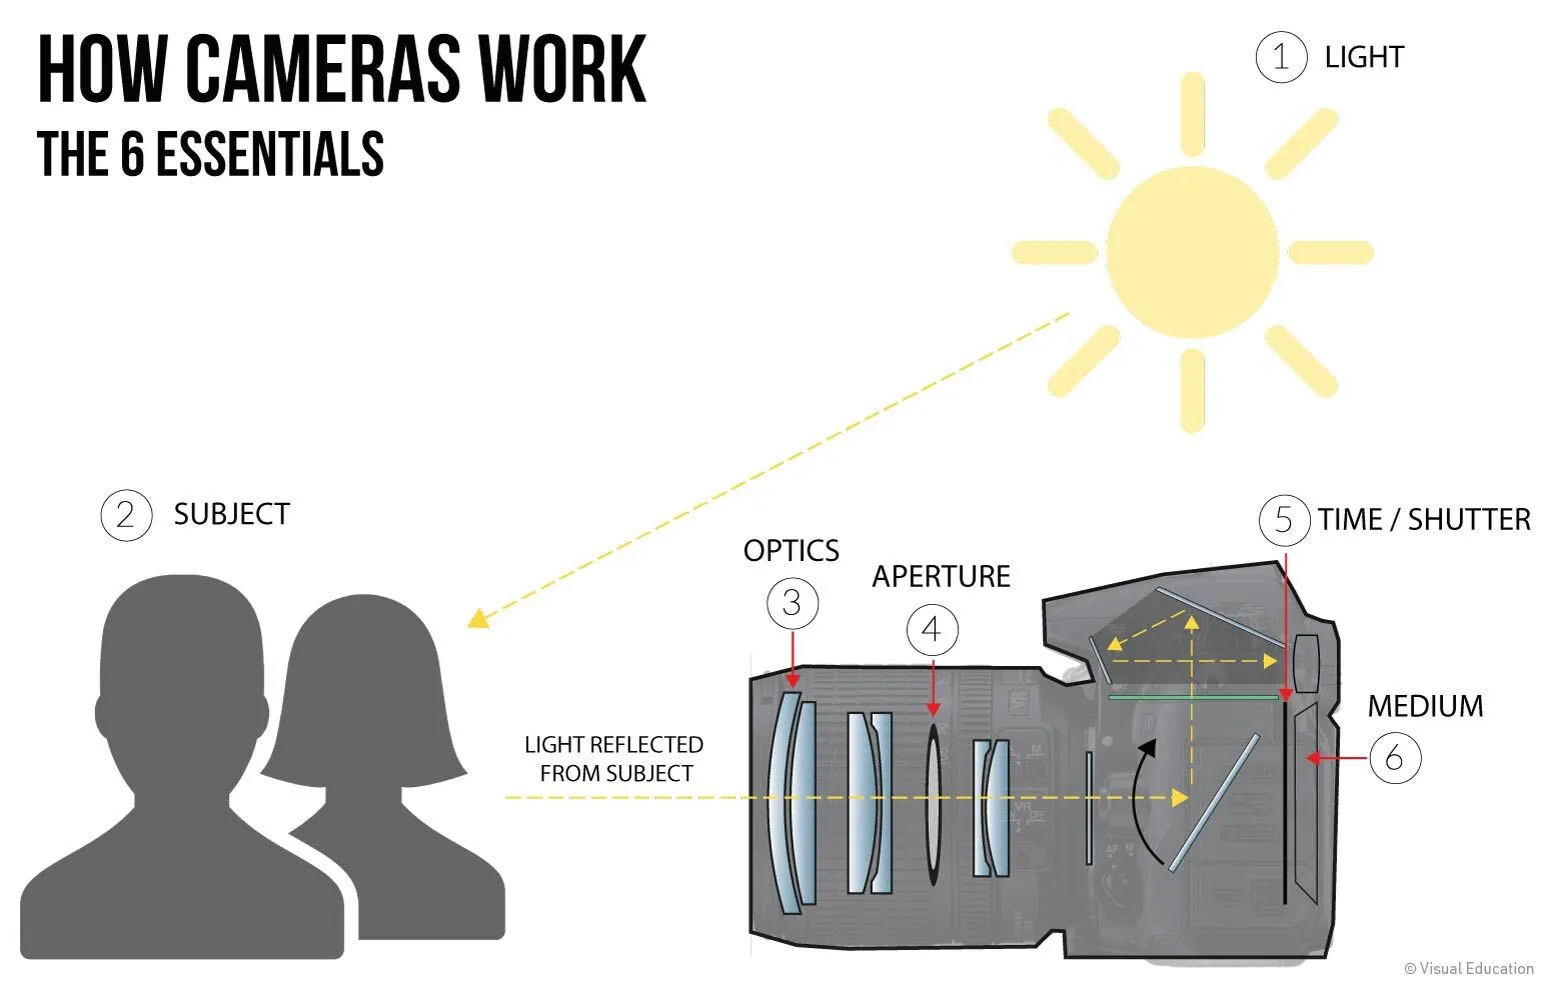
Once you understand these concepts and how they relate to one another, you can better start to understand how cameras work.
-
-
Exposure
Exposure refers to the brightness or darkness of an image. When an image looks too bright, it is overexposed. When it looks too dark, it is underexposed.
We can control the exposure of an image using the two main mechanical functions of a camera: shutter speed and aperture. Using these two functions, either individually or in combination, allows us to control the amount of light that reaches the recording medium, as you can see in the video above.
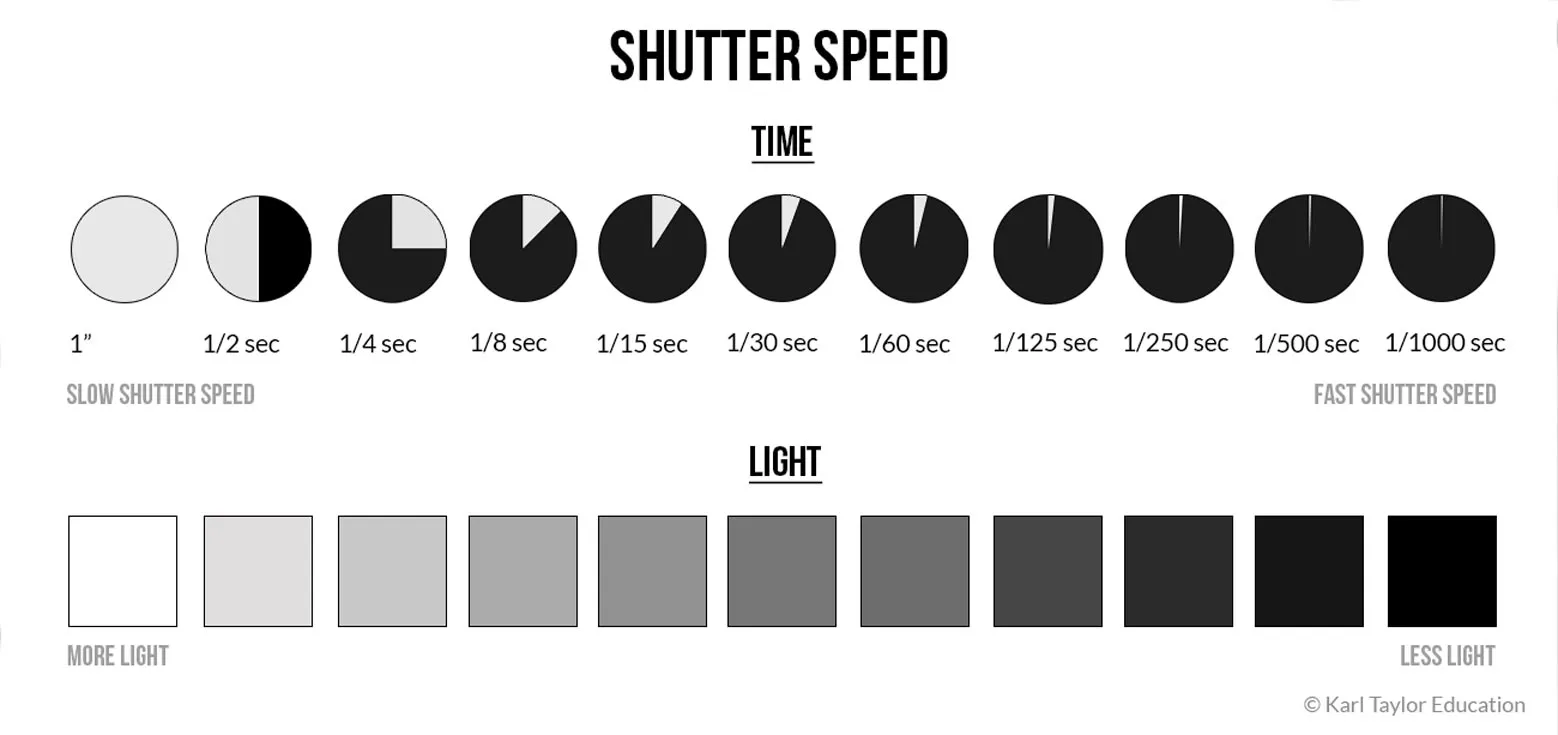
Shutter speed (sometimes called ‘exposure time’) determines how long the shutter on your camera stays open when you take a photo. The slower the shutter speed, the longer the shutter stays open, the more light reaches the recording medium. Faster shutter speeds mean the shutter stays open for a shorter duration, allowing less light to be recorded.
Aperture
Aperture refers to the opening in a lens through which light passes before reaching the recording medium. The greater the aperture, the more light passes through. Aperture is recorded in 'f-stops' and shown as f1.2, f5.6, f16, etc.
The lower the number, the larger the aperture and the more light that can be recorded. For example, f4 gives a much larger aperture than f32. This can be confusing at first, but you’ll soon get used to it!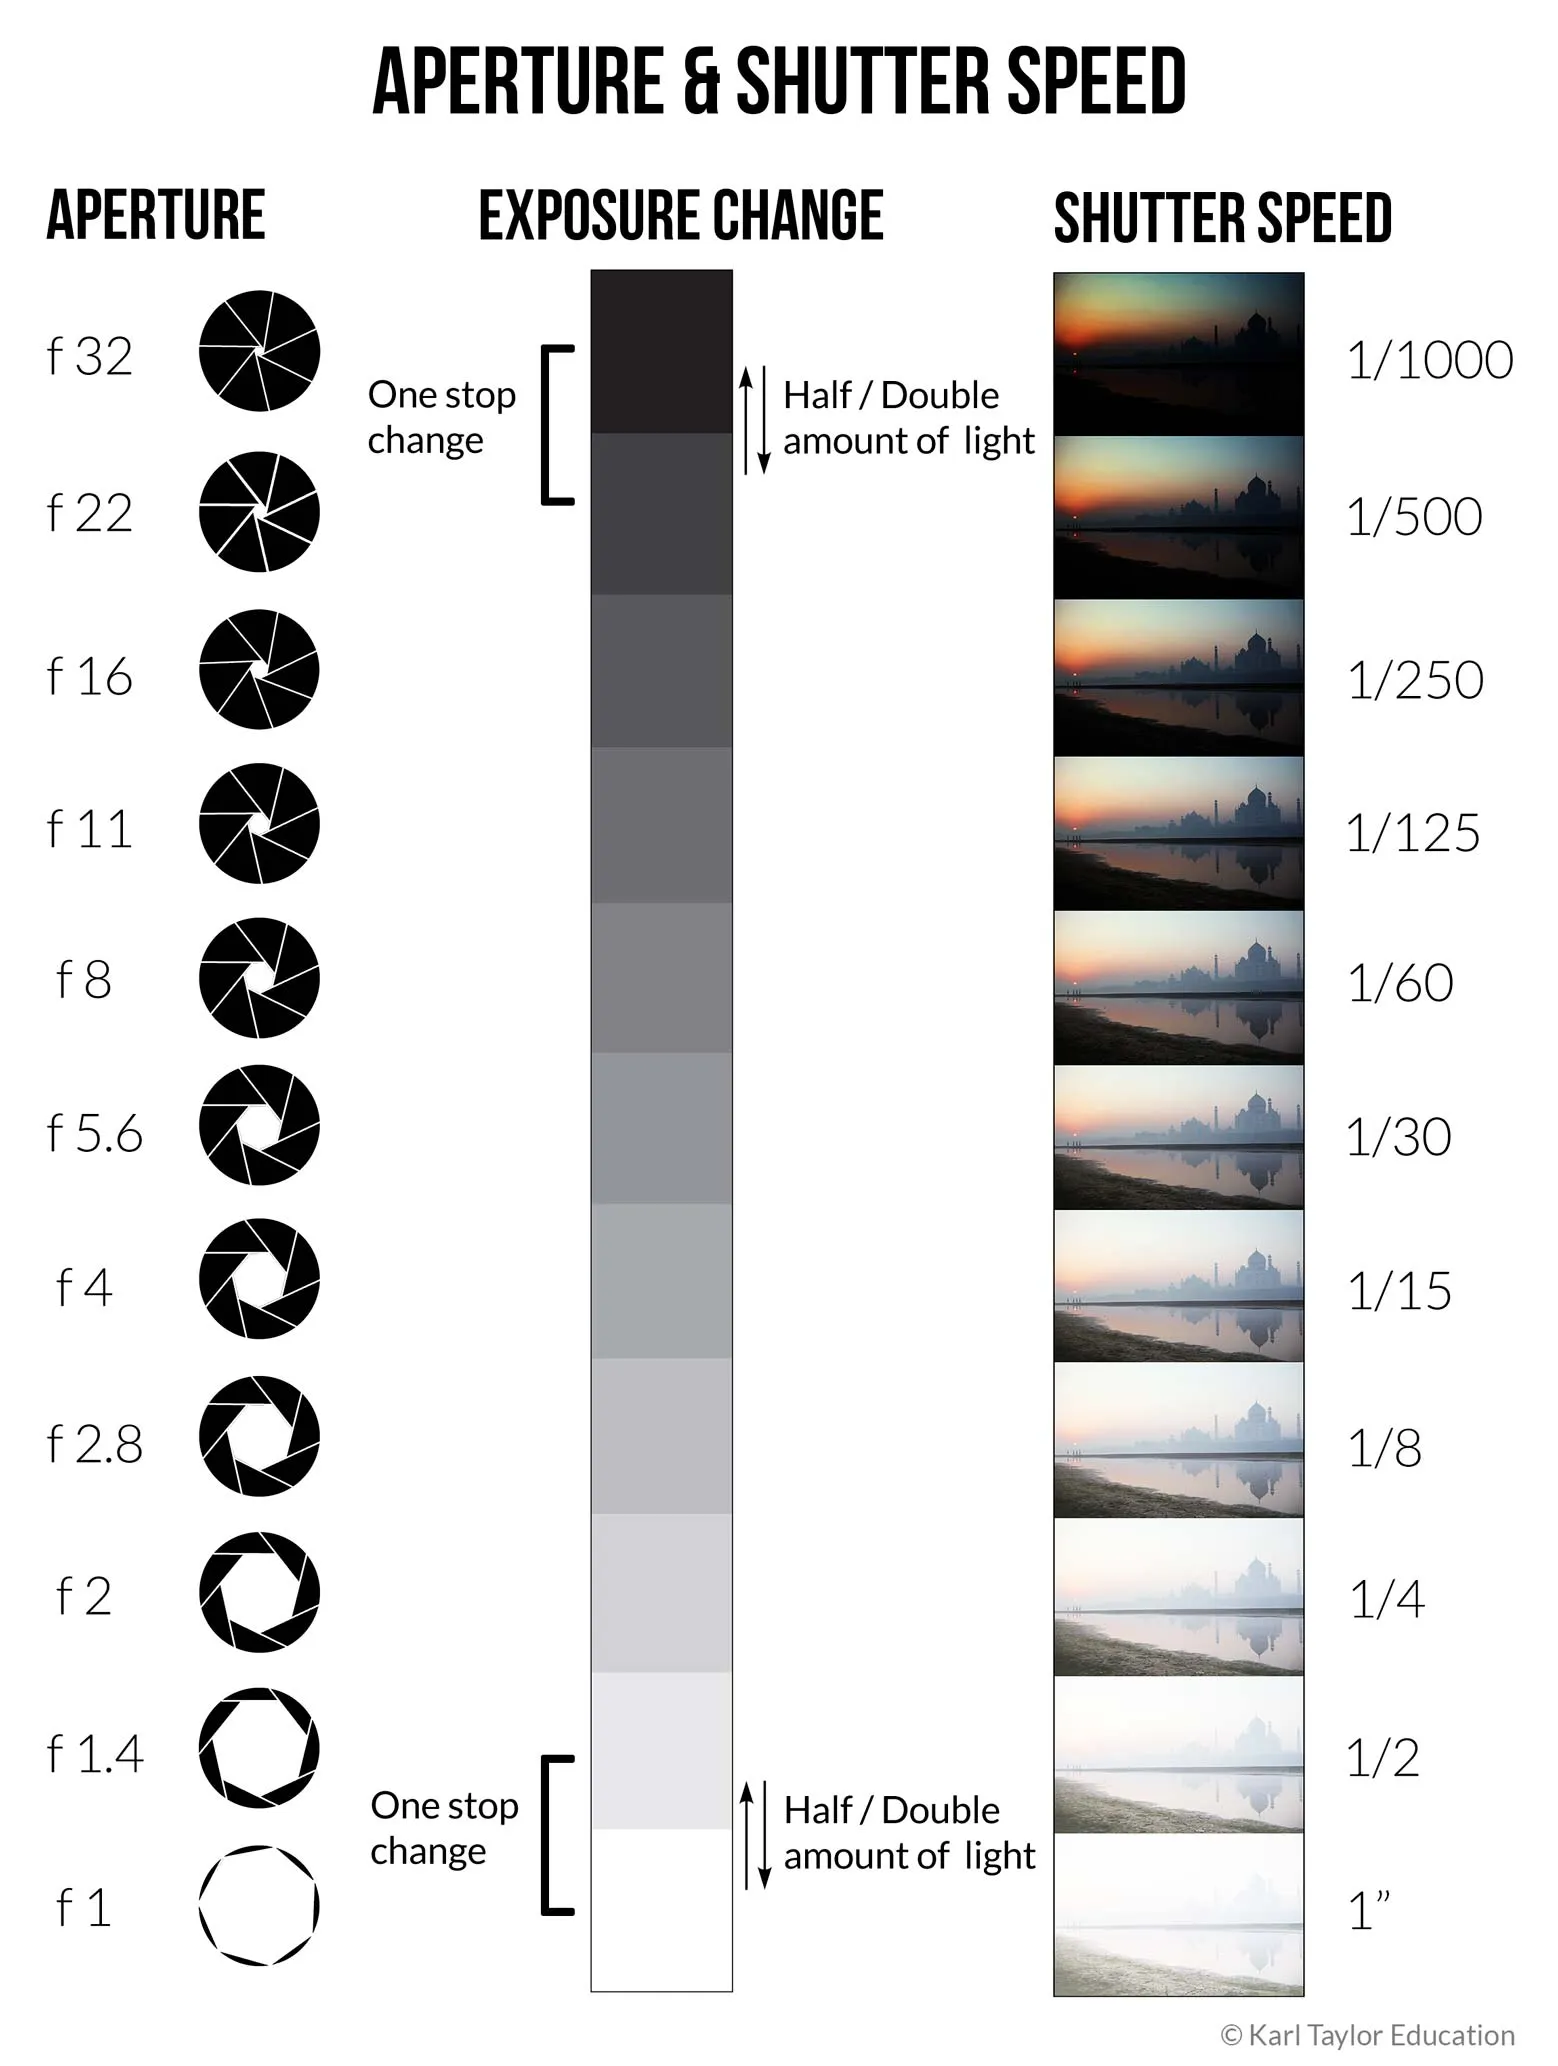
To expose an image correctly, you need to find the right balance between shutter speed and aperture. You can do this using your camera in Manual mode and referring to the built-in light meter (as shown in the video above).
As you search for the right exposure, you can add or subtract ‘stops’ of light by changing the aperture or shutter speed.
A change in any setting that doubles or halves the amount of recorded light is known as a one-stop change. For example, a change in shutter speed from 1/125 to 1/250 will decrease the exposure by one stop. Another example would be opening the aperture from f16 to f8, which will result in a two-stop increase in exposure.
Determining the correct exposure
Once you’ve understood aperture, shutter speed and one-stop changes, the next step is to learn how how to find the right exposure. This is something many photographers struggle with.
Of course, photography is a creative art, and you are free to expose your images however you choose. But if you are looking for objectively ‘correct’ exposure, there are tools you can use.
One is your camera’s built-in light meter, which you can see through your viewfinder. Most cameras have a meter from -3 to +3 stops, with 0 indicating the ‘correct’ exposure (according to your camera). Anything to the left of 0 (in the minus) is considered to be underexposed and anything to the right (in the plus) is considered to be overexposed.


 Light meters can look slighty different from one brand to the next, but essentially they all tell you the same thing.
Another tool for judging exposure is the histogram, which you can refer to after you’ve taken your picture. A correctly exposed image will have a histogram that is evenly spread from edge to edge without any gaps.
The left side of the histogram represents the blacks and shadows in an image, while the right side represents the whites and highlights.

You can view the histogram for an image on your camera or in photo editing software.

Here you can see a histogram on the back of a camera.
Don’t get too caught up in what your light meter or histogram are telling you. Why not? Because the scene or subject you’re photographing can often confuse your camera.
For example, your camera might suggest that a shot of a white cat in the snow is overexposed and overcompensate until you have a grey cat on grey snow. Similarly, it might also struggle with something like a black dog on a black blanket and try to increase the exposure until you have a grey dog and grey blanket.
Remember that it’s your image and you should make the creative decisions – not your camera. Over time, with practice, you’ll be able to judge what exposure you want and how to achieve it.
-
Quiz
Quick question for this chapter.
You have 4 question to be answer.
-
-
-
Lesson
What is shutter speed?
Shutter speed determines how long your camera’s shutter stays open when you’re taking a photo.Changing shutter speed effects the exposure of an image, as well as our ability to freeze or blur motion.What is shutter speed in photography?
When we take a picture, the camera’s shutter opens to allow light to reach the recording medium,where an an image is created. By controlling how long the shutter stays open, we can control what the resulting image looks like.
Also known as ‘exposure time’, shutter speed is measured in seconds or fractions of a second (tenths, hundredths, or thousands). For example, a slow shutter speed of 1/2 means the shutter remains open for half a second, while a faster speed of 1/2000 means it only remains open for one-two-thousandth of a second.
Some DSLR cameras can go as fast as 1/8000 and as slow as 30”. If you’re shooting in Bulb mode, the shutter remains open for as long as you press the shutter release.

Shutter speed: 18 minutes | Aperture: f8
Slow shutter speed
A slow shutter speed keeps the shutter open for longer. This not only allows more light to be recorded, it also means any moving objects will appear blurred. Slow shutter speeds are commonly used for photographing in low light conditions, or to capture motion blur. To avoid any unwanted extra blurring caused by camera movement, be sure to use a tripod when shooting with slow shutter speeds.
Slow shutter speeds can be used for creative techniques such as panning, or combined with flash to capture both frozen and blurred movement.
A good rule of thumb is to avoid using a shutter speed value below that of your focal length. For example, if you’re shooting with a 50mm lens, don’t go lower then 1/50. If you’re shooting with a 200mm lens, don’t go lower than 1/200. If you do, it might be necessary to use a tripod.

Shutter speed: 4 sec | Aperture: f22

Shutter speed: 13 sec | Aperture: f13
Fast shutter speed
Faster shutter speeds keep the shutter open for a shorter period of time, allowing less light to reach the recording medium. Faster shutter speeds will also freeze movement and are often used to photograph fast-moving subjects like athletes or wildlife.
Shutter speed: 1/1000 | Aperture: f5.6
How to change shutter speed
If you’re shooting in Auto, the shutter speed (along with the aperture) is determined automatically by your camera.
If you want to get out of Auto mode and experiment with shutter speed without worrying about aperture, you can use Shutter Priority mode (shown as TV or S). Great for beginners, this mode is also used by professionals shooting in conditions where the light changes quickly and often.
In Manual mode, you set both shutter speed and aperture yourself. On DSLR cameras, you can see the shutter speed on the top LCD panel, on the back screen and through the viewfinder.
How you set the shutter speed varies from camera to camera. Some cameras even allow you to set which control wheel you use.

The optimum shutter speed for a given image will depend on what and where you’re photographing. If you’re photographing fast moving objects and looking to freeze motion, a fast shutter speed will be best. However, this will limit the amount of light reaching the sensor, so you will likely need to compensate by using a wider aperture.
From the example of the bicycle shown in the video, we can see a shutter speed of 1/30th results in a good amount of motion blur. However, at f16 the picture is too dark.
To correct this, we needed to open the aperture to allow more light in. A one- stop change, from f16 to f11, meant we were able to keep the same level of motion blur while lightening the image and therefore achieving the correct exposure.


This demonstrates why understanding f-stop changes, and the relationship between shutter speed and aperture, is so important.
-
-
-
LessonUnderstanding focus is key to taking good photographs. You may be thinking, the camera does it all for you, doesn’t it? With modern DSLR cameras, that’s often the case, but knowing how to focus manually will help you achieve much more creative results.When you take a photo, light passes through the lens on your camera before it reaches the recording medium. The lens, regardless of whether it’s built into your camera or interchangeable, contains various elements that focus the light.

Manual focus vs autofocus
Most modern lenses can be focused both manually (MF) and automatically (AF). You can adjust this setting on the lens itself.
You can set the focus manually by adjusting the focus ring of your lens. Manual focus is useful when your camera has difficulty focusing, or when you’re taking a series of images in which you don’t want the focus to change.
Autofocus refers to the mechanism that automatically moves the elements within the lens in order to achieve the best focus. This is done through a series of autofocus points that are visible through the viewfinder. The camera (or photographer) selects a particular focus point and this is used to achieve focus.


Above are two examples of what you can expect to see through your viewfinder. This not only shows how different cameras have different focus layouts, but also how they have a different number of focus points for you to choose from.
Your camera automatically selects a focus point in one of two ways:
Phase detection: This is the system most commonly found in DSLR cameras. Phase detection is very fast, which makes it great for tracking moving objects. Although the system doesn’t always get it right, this technology continues to improve.
Contrast detection: This system is commonly used in mirrorless cameras, point-and-shoot cameras, DSLRs in live view mode and smartphone cameras. Much simpler than phase detection, it is slower but much more accurate, which makes it far better suited to genres like product or landscape photography.
Different cameras have different focus systems, and different focus points. Depending on the focus mode you choose, you or the camera can choose the best point of focus. Some modern cameras also feature eye detection, which can be very useful as they eyes are often the best place to focus.
Focus modes
When you’re using autofocus, there are a number of different modes to choose from. Each is best suited to particular scenarios.
Single shot/Single-servo focus mode: Only one focus point is used to determine focus. This does not change until you refocus. This is shown as ‘One-Shot’ on Canon / ‘AF-S’ on Nikon.
 Continuous focusing/Continuous-servo: Once a focus point is set, the camera monitors the distance of the subject from the camera and readjusts as necessary for as long as the focus button is held down. This is shown as ‘Al servo’ on Canon / ‘AF-C’ on Nikon.
 Automatic autofocus mode: This is a cross between single shot and continuous focusing. The camera focuses on a single subject and only refocuses when the subject moves. Until that point, the mode behaves more like single shot than continuous focus.
Where to focus when taking a photo
Where you focus in an image depends on a number of factors, most notably what you’re photographing and what result you want to achieve. In the video above, you can see how different focus points can have a big impact on an image.

When selecting your focus, it’s important to think about two specific things: your subject and depth of field. What do you want to be in focus, and how much of the subject do you want to be sharp?
Depth of field (controlled by adjusting the aperture) will increase or decrease the sharpness either side of your focus point. We’ll look at this in more detail in the next chapter.
-
-
-
Aperture & Depth of Field
Aperture is one of the six essential elements of photography. It controls both how much light your camera is able to record and also the depth of field. Depth of field (DoF) is an important compositional and creative element in any image, so it’s important to understand what it is and how to control it.What is aperture?
As we discussed in chapter 1, aperture refers to the opening through which light passes before hitting your camera’s sensor. By controlling the size of that opening, we can control how much light is recorded in an image as well as the depth of field.
The larger the aperture, the more light is recorded and the shallower the depth of field. With smaller apertures, less light is recorded and the depth of field is greater. Aperture is recorded in f-stops and is shown by the symbol ‘f'.

Large aperture vs small aperture
Aperture can be quite confusing at first, but it's important to understand the difference between large and small apertures. The simplest way to remember it is: the lower the number, the larger the aperture. When referring to ‘large’ apertures, we are not referring to a large number value. Instead, we are referring to the aperture or exposure value. So, for example, f1.4 is a large aperture, while f22 is a small aperture.Large aperture size = Smaller f-stop number = Shallower DoF
Small aperture size = Larger f-stop number = Deeper DoF

What is depth of field?
Depth of field is the sharpness range either side of a focus point. This is controlled by the aperture. Larger apertures (smaller f-stop numbers) result in a shallower depth of field, where less is sharp. Smaller apertures (higher f-stop numbers) result in a greater depth of field, where more is sharp.

How to control depth of field
There are three different factors that influence depth of field — aperture, distance from your subject and magnification. First, let’s look at how to change your depth of field using different aperture settings.
If you’re shooting in Auto mode, your camera will decide the ‘best’ aperture for you. If you’re shooting in Aperture Priority mode, you can simply set the aperture by using your camera’s control dial and your camera will automatically determine the shutter speed.
If you’re shooting in Manual mode, you have the greatest level of creative control, but you have to balance your aperture and shutter speed to get the best exposure. In any of these modes, you can simply adjust your aperture using either the front or back control wheel of your camera.


DoF is also dependent on the distance from your subject. The closer you are to the subject, the shallower your depth of field will be. Shooting from further away will give a much greater depth of field. This is due to magnification.
Magnification can refer to the sensor size, focal length and distance from the subject. For example, a larger sensor size, longer focal length or closer focusing distance will result in shallower depth of field. At the same aperture, full-frame cameras will have a shallower depth of field compared to crop-sensor cameras. Again, at the same aperture, medium-format cameras will have an even shallower depth of field than full frame cameras.
Lenses and depth of field
Another factor in depth of field is your choice of lens. Different lenses have different depth of field characteristics, which is caused by the magnification of the lens. The greater the magnification (as with telephoto lenses), the shallower the depth of field, and vice versa.
This means that if you’re shooting at f4 using a 24mm focal length 10m from your subject, you will have much greater depth of field than if you were shooting f4 using a 200mm focal length at a distance of 10m.

Depth of field examples
This natural-light portrait image below was captured using an aperture of f1.2, keeping the subject sharp while the foreground and background remain out of focus. Full open apertures, as used in the image above, are great for photographing people. Why? Because they allow us to blur the background and bring attention to the eyes or face of the subject. On the other hand, if we’re photographing landscapes, generally we want more depth of field so that we can see into the distance. This is why smaller apertures (such as f16) are often best for landscape photography.
An aperture of f22 was used for the image above. You can see how the depth of field runs much further, keeping both model and the background in sharp focus.
-
-
-
Now that you understand the fundamental concepts of shutter speed, aperture and exposure, you’re ready to start using your camera in Manual mode!
The best thing about working in Manual mode is that you have full control. By simply adjusting shutter speed or aperture, you’ll be able to fine-tune each little detail of your image.
If you want to achieve beautiful images with soft bokeh backgrounds, blur motion to get silky smooth water shots, or get crisp, sharp action images, all you need to do is adjust your settings.

How to shoot in manual mode
All you need to do is switch to ‘M’ on your camera dial. Now, you have full control. But with great power comes great responsibility! Your camera will no longer automatically adjust anything for you.
The first step is to think about what you’re shooting. Are you photographing a landscape where you want a large depth of field? Or are you photographing motorbikes, where you need a fast shutter speed to freeze the action?

Full image.

Cropped image.
In the landscape image above (which you can see me shoot in the video), I decided to use a shutter speed of four seconds. This allowed me to capture some motion blur in the waves. As the light decreased with the setting sun, I had to adjust my aperture in order to maintain the four- second exposure. While I could have adjusted the shutter speed, I knew that if I slowed it any further I would get too much motion blur.
You can clearly see the effect of that four-second exposure in the cropped image. The slower shutter allowed me to capture some of the movement in the water, creating a smooth, silky effect. This was a creative decision that I could only have achieved by shooting in manual.

 The two examples above show the difference between a shallow depth of field, which is a common choice for portrait photography, and a greater depth of field for a more fashion-style image.
The advantage of shooting in manual is that it gives you precise control over your images. You can select the exact exposure, depth of field, or amount of motion blur, without leaving anything to chance.
But by making these decisions yourself, it's important that you understand how to compensate for any adjustments you make. Any change in exposure – whether achieved by adjusting shutter speed or aperture – will need to be balanced with an equal change in the other setting.
To begin with, while you’re still getting to grips with shooting in manual mode, you may need to check your images to see that you’re achieving the correct exposure.
Now you understand how to control the different settings on your camera and shoot in Manual, the next step is to take a look at how different lenses can influence your shot.
-
-
-
Lenses play an important part in photography. In fact, your choice of lens is arguably even more important than your choice of camera.Different lenses produce different results depending on the configurations within the lens barrel. These configurations determine the magnification and angle of view and allow us to create different effects.
How camera lenses work
Lenses focus the light onto the recording medium, which allows an image to be recorded. As you’ll see from the illustration of a DSLR camera below, light enters the lens and passes through the front element (2) before reaching several lens elements (3, 5 & 6).
These elements serve to direct the light to a single focal point so that it can accurately be recorded by the sensor (9) once the mirror (7) flips up (triggered when you press the shutter button). Mirrorless cameras work the same way, but do not have the mirror or prism.
 The quality of a lens depends on various factors. One is its maximum light gathering ability (f-stop number written on the lens). Another is its resolving power (how sharp the images produced are). Yet another is the colors it can focus (quality of the glass). Also important are the contrast it achieves (also the quality of the glass) and the material the lens is made from.
What the numbers on a lens mean
Now you understand how a lens works, you might be wondering what all the numbers (and letters) on a lens mean.
Typically, lens names are formatted like this: Canon EF 24-70mm f/2.8L II USM Lens or Nikon AF-S 50mm f/1.8G. Each of these numbers and letters relays essential information, such as focal length, maximum aperture, lens version and focusing motor. Other features specified can include stabilisation, filter diameter and focusing distances.
 When you’re looking to buy a lens, it’s important to consider each of these points. Together, they will help you understand the characteristics and capabilities of the lens.
Types of camera lenses
Lenses can be categorised into two main groups: prime or zoom lenses. The main difference between the two relates to focal length.Prime vs zoom lenses
Prime (or fixed) lenses feature a fixed focal length. Available in a range of focal lengths, these lenses are known for delivering high-quality images. They also generally offer much wider apertures than zoom lenses do.
Zoom lenses provide a variety of focal lengths. This makes them very versatile and reduces the need for multiple lenses.
Focal length
Focal length determines angle of view and magnification. When light enters a lens, glass elements within the lens serve to converge the light to a single point, known as ‘focus’. The distance between this point and the centre of the lens is the focal length.
Focal length is usually indicated both on the side of the lens barrel and sometimes on the front of the lens, along with the lens diameter.
Focal lengths range from 8mm to 2000mm. Different lengths are better suited to different genres of photography.
Lenses with shorter focal lengths provide a much wider angle of view and less magnification. This makes them better suited to landscapes than to product photography.
Longer focal lengths offer a narrower angle of view and more magnification, which means they are better suited to sport or wildlife photography than architectural photography.
 Focal length can also impact camera shake. Because of the greater magnification they offer, longer focal lengths are more susceptible to camera shake. This means that the tiniest movements become magnified and can result in blurred photos. Shooting with a shutter speed equal to or greater than the focal length can help prevent camera shakes ruining your images.
Aperture
Aperture refers to the opening in the lens that controls how much light reaches the sensor. This is indicated in the format 1:2.8, for example, with the second set of numbers indicating the maximum aperture.
Some lenses will feature two maximum apertures (shown as 1:4-5.6). This means that, as you zoom, the aperture capability changes. So at the shortest focal length, you may be able to shoot at f4, but once you zoom to the longest focal length, the widest aperture you’ll be able to shoot at will be f5.6. Generally lenses with wider apertures are favourable due to their increased light-capturing capabilities.
Some lenses feature a fixed aperture. Catadioptric, or mirror lenses, which used to be fairly common, usually feature a longer focal length, such as 500mm at a fixed aperture of f6.3. Most telescopes are catadioptric.
 An example of aperture blades that are partially closed to approximately f8. © Karl Taylor
Pinhole cameras
Throughout this course, we’re referring to six essentials of photography. However, it is important to mention that this could in fact be five! Why? Because images can be recorded without a lens on so-called pinhole cameras (or camera obscuras).
However, recording an image without a lens is far more complex, and doesn’t afford the photographer the same creative freedom. Essentially, without a lens, you're shooting at a very small fixed aperture. Thanks to the variations in magnification they offer, lenses allow us to shoot many different objects, which simply wouldn’t be possible with a camera obscura.
-
-
-
Understanding light and learning to paying attention to it is one of the quickest ways to improve your photography.
“Light makes photography. Embrace light. Admire it. Love it. But above all, know light. Know it for all you are worth, and you will know the key to photography.” George Eastman, founder of Kodak
Light is what allows us to convey information and, more importantly, emotion in an image. Once you understand light, you’ll be able create a wide variety of creative and effective images.

The best light for photography
Light is all around us. It comes from a variety of sources, both natural and man-made, and we can use it to create different moods and atmospheres in our images.
There are four main categories of light:
1. Transmitted light is light that you can see emitted from its source. This means we can see the light source itself in the picture, e.g. a candle or the sun.
2. Reflected light occurs when light reflects off your subject. Almost all of the photographs we take make use of reflected light. Occasionally, transmitted light can also be visible in the same scene.
For example, a landscape image featuring the setting sun visible would include both transmitted and reflected light. However, if the sun was not visible in the frame, it would only be reflected light.
3. Hard light comes from a light source that is small compared to your subject, e.g. a light bulb or the (distant!) sun on a clear day. It results in very dark, very sharp shadows. Used correctly, hard light can be good for revealing textures in objects.
4. Soft light comes from a light source that is large compared to your subject. It produces light that is low in contrast, with minimal shadows. The sun on an overcast day provides soft light because the clouds serve to diffuse the light, spreading it over a much larger area and therefore creating a large apparent light source.
 TIP: To better understand light and how it works, try look at it in different situations and try to figure out what type of light it is. This will help you learn how different types of light create different effects and how they work with different subjects. It’s also good to keep in mind that you can also mix different types of light in an image, which can produce very interesting results.
Types of light in photography
Many photographers will tell you that the best light for photography occurs during ‘the magic hour’. This is the hour just before and just after sunset or sunrise. The ‘magic’ comes from the combination of hard and soft light occurring simultaneously. An example of combined hard and soft light, which you commonly see during sunset or sunrise. © Karl TaylorHowever, the magic hour is not the only time to photograph. Once you understand the different types of light, you’ll understand how to control light to get great results at any time of day – even noon!
 Both soft and transmitted light can be seen in this portrait. © Karl Taylor
Ways to use light in photography
The direction, hardness or softness, and temperature of light can all have an impact on the mood and feeling of an image.
Side light, for example, evokes feelings of romance and nostalgia, whereas light from below creates a sense of fear. Hard shadows create more drama than soft shadows, and cool colour tones convey more negative emotions than warm light.


How to control light
As photographers, there are a number of different ways we can control natural light to help us get the result we want.
One of these is planning. By planning ahead, you’ll be able to get the best type of light for your shot. For example, if you want warm, golden light with long shadows, you should be shooting sunrise or sunset. If you want a subtler light with softer shadows, wait for a cloudy day – or work indoors, as Karl does in the video.
You can also control natural light with reflectors. These simple accessories can be great for adding more light to your subject (or, if you use a dark reflector, darkening your scene).
Alternatively, diffusion material spreads light and soften shadows, much like clouds on an overcast day.
 Finally, you can use flash – either on-camera, speedlights, or studio flash (also know as strobe lighting). Studio lights can be modified with modifiers, which can drastically alter the effect.
White balance
When working with different types of light, it’s important to keep white balance in mind. Why? Because different types of light produce very different colours.
To compensate for different colour temperates, you can use the different colour balance settings on your camera. Auto white balance automatically corrects the colour cast caused by different colour temperatures, though there are other presets such as daylight, shade, tungsten or flash, for example.
You can also control white balance manually using the Kelvin scale, which ranges from 1000K to 10,000K. The higher the Kelvin value, the bluer the light.
For example, if you’re shooting on an overcast day, using a lower Kelvin value will make your image appear bluer. Therefore, to make your image appear more neutral, you'll need to use a Kelvin value of around 7000 - 9000K.

-
-
-
When it comes to image quality, the first thing many new photographers think about is megapixels. But there’s much more to image quality than just the number of pixels, with sensor type (and size) and ISO also playing key roles.

An image is recorded when light passes through the lens and reaches the recording medium. Through composition and framing (which you’ll learn about in the next chapter), and also by adjusting the aperture and shutter speed, we can control how this image looks. What we cannot completely control is the image quality.
That’s because image quality is mostly determined by factors such as the sensor itself, the resolution (number of megapixels) and ISO.
If you want to understand image quality, you need to understand each of these factors.
The recording medium
 Historically, the recording medium in photography was film. Today, it is usually a digital sensor.
Camera sensor types
The two main sensor types are CCD (Charge-Coupled Device) sensors and CMOS (Complementary Metal-Oxide Semiconductor) sensors.
Until recently, CCD sensors were the most commonly used type of sensor due to their excellent image quality, dynamic range and noise control. However, as technology has progressed, CMOS sensors have taken over.
Generally speaking, larger sensors offer higher quality, while smaller sensors provide a more budget-friendly option, while still delivering great results.
Camera sensor sizes (or formats)

 Maybe you’ve heard of full-frame, crop-sensor and medium-format cameras. But what’s the difference?
Crop-sensor cameras, also referred to as APS-C, come with the smallest sensors. With sensor dimensions of approximately 23.5mm x 15.6mm (compared to 36mm x 24mm full-frame sensors), these cameras are smaller, lighter and more affordable than their full-frame counterparts.
Full-frame sensors do not have a pre-determined crop. Because they are larger than crop sensors, they offer better image quality and enhanced performance in low-light conditions.
The largest sensors are found in so-called medium-format cameras. The benefit of these 53.4mm x 40mm sensors is that they allow for much higher resolution compared to cameras with smaller sensors. Mostly used by professionals, these cameras offer very high quality results, but are also more expensive than crop-sensor or full-frame cameras.
Megapixels and resolution
Often used interchangeably, the terms ‘megapixels’ and ‘resolution' actually mean two very different things. Understanding the difference is crucial if you want to get the best possible results out of your camera.Megapixels

An example of a 100 megapixel image.
One megapixel is made up of a million pixels. This means that a 24-megapixel camera will record an image that is made up of 24 million pixels, while a 16-megapixel camera will record an image with only 16 million pixels. Each individual pixel contains information that contributes to the image as a whole.
When it comes to image quality, the number of megapixels is not the only thing that matters. Also important is the size of the photosites. Photosites, which record pixels, are measured in microns (µm). Their size is largely determined by the sensor size.
Cameras with smaller photosites may perform worse in low-light conditions. They may also suffer more diffraction when you’re shooting at small apertures. Larger photosites allow for a larger transitional tonal value, greater tonal accuracy and better colour accuracy.
Resolution
Contrary to popular belief, ‘resolution’ does not simply refer to the number of megapixels. Instead, it refers to how clearly the medium can capture and record detail.
For example, by simply using two different versions of the same lens on the same camera, we could change the resolution. An image shot with an older lens will have a lower resolution than the same image shot with a newer model lens with a better optical design. The same number of megapixels will be recorded (because it is the same camera), but the newer lens design will likely give better contrast, colour fidelity and overall sharpness.
ISO in photography
ISO measures how sensitive the recording medium is to light. Just as film comes with different sensitivities, digital cameras can be made more or less sensitive to light by adjusting the ISO setting.
Higher ISOs mean greater sensitivity to light, while lower ISOs mean less. Though increased sensitivity may sound good in theory, higher ISOs can lead to lower image quality. This is typically due to ‘noise’, especially in the shadow tones.

Like shutter speed and aperture, camera ISO can also impact the exposure of an image. However, it should not be used as a tool to do this, except as a last resort.
Although it can be very useful in low-light conditions, the ISO setting should not be relied on due to its impact on image quality. It is far better to get your exposure correct using shutter speed and aperture where possible.
JPEG vs RAW
Also important for image quality the file format you shoot in: JPEG or RAW.
Although both file types contain the same number of pixels, RAW files store far more information within those pixels than JPEG images do. This means RAW files give us far more control in the post-production stage, which can be very useful if you want to make changes to your pictures after shooting.
One of the main drawbacks of JPEG files is compression, which can sometimes result in ‘pixel clumping’. This occurs when pixels of a similar tone are grouped together. Although clumping may not initially be apparent, it becomes more obvious and problematic as soon as we start to adjust colour and exposure in post-production.
Although JPEGs may not allow us to extract as much colour detail as RAW files (especially in highlight or shadow areas), they are still popular among photographers – such as wedding or sports photographers – shooting large quantities of images in a session. As you may have guessed, this is because, due to their compression, JPEG files are much smaller. This means you can fit many more JPEGs on a memory card than you can RAW files.
 In the RAW file, there is no pixel clumping, even when adjusting the highlights and shadows.
 When we adjust the highlights and shadows, pixel clumping starts to become visible in the JPEG file.
Though all of these factors contribute to image quality, you don’t have to shoot with the camera with the largest sensor, with the most megapixels, at the lowest camera ISO. In other words, don’t be put off if you don’t have a fancy camera!
The fact is, most of the cameras on the market today are of exceptionally high quality. And besides, equipment is only one part of the photography puzzle. With the right knowledge, you can create amazing images with any camera.
-
-
-
We’ve looked at how cameras work, how to get creative using aperture and shutter speed, and how lenses and light can impact your shot. But one element of photography we haven’t yet discussed is composition.

Composition in photography
Composition refers to how we lay the picture out and how we position subjects within the frame to get the most aesthetically pleasing results.
The purpose of good composition is to guide the viewer’s eye through the picture. We can achieve this through careful framing, arrangement and placement.
Although there are many well-known compositional guidelines (such as the rule of thirds or golden ratio), they are simply that – guidelines. Some of the best images completely ignore traditional compositional conventions. So why is it important to know and understand them?
Following compositional guidelines doesn’t guarantee a great image. But it will give you a much better chance of capturing a good one.
Rules of composition
The most widely known rule of composition is the rule of thirds. It’s easy to remember and simple to apply, which makes it ideal for novice photographers.What is the rule of thirds?
The rule of thirds divides the image into three rows of three, splitting the image into nine equal blocks. The idea is to position important elements so that they fall either on the dividing lines or at the points of intersection.
Placing objects within these areas helps to create more interest in the image than if you were to simply centre your primary subject.
 In the video above, I explain the rule of thirds and show you a number of examples in which I’ve applied it. But there are a few other ‘rules’ of composition to keep in mind.
Golden ratio
The golden ratio is a mathematical formula that relates to Phi (1.6180339…). Two quantities (a and b) fit the golden ratio if b is to a what a is to the sum of a + b. In this ratio, a is 1.6180339 times bigger than b. This formula forms the basis for other compositional rules, such as the golden spiral and even to some extent the rule of thirds.
Golden spiral
Developed by Fibonacci, the golden spiral is, contrary to its name, composed out of a series of Phi Grids. These grids determine the path of a snail-shaped spiral (known as the Fibonacci Spiral), which guides your eye around the image to the focal point.
Composition techniques
In addition to compositional rules, there are a number of compositional techniques you can use when creating your images.
Leading lines
Leading lines are lines (or curves) that guide the viewer’s eye to the subject. From fence posts to winding roads, leading lines can be straight, curved, diagonal or converging. These lines help keep our eye in the frame and draw attention to the subject.

Symmetry
Although it contradicts the rule of thirds, symmetry can be very effective when used correctly. In addition to creating a pleasing sense of harmony in an image, symmetry can help remove or minimise additional distractions and focus the viewer’s eye.
See the images above and below for examples of symmetry.

Colour
Colour is an important part of photography. When used creatively, it can help us to achieve some interesting compositional effects. For example, we can use colours to influence the mood and feel of an image, or to draw attention to particular elements within it. Juxtaposing colours can be a particularly effective way of catching the viewer’s attention, as I demonstrate in the video.
In the images above and below, colour theory is used as a compositional technique.

Framing
Framing means using secondary elements within an image to frame its primary subject. It’s a great way to create depth and three-dimensionality. The elements you use to frame your subject add perspective and a sense of scale, as well as additional points of interest.

Your goal as a photographer is to catch and maintain your viewer’s attention by keeping their eye in the frame. In addition to using the compositional rules we’ve explored, you can achieve this via various techniques linked to the human visual system, such as left-to-right bias, contrast, narrative, and so on.
Of course, good photography comes down to far more than just good composition. That’s why it’s important to understand everything we've covered in this introductory course: how cameras work, how time and aperture can be used together for creative imagery, optics and their differences, the importance of light for conveying emotion and the different types of recording mediums and how these relate to image quality.
-
-
-
Page

Photography is more than a documentation process it is more, it is an art form and should be treated with the same respect as painting, sculpture, and the other well known art forms. Photographs, like paintings, are artificially constructed portrayals: they have to be carefully composed, lit and produced. It's difficult to see why for so long photography struggled to gained its recognition as a legitimate art form. Photographers like other artists show their knowledge of art through the images. We have reached a point in history when photographs are more accessible than anytime before and through the advancements in digital technology taking photographs is easier and more convenient than ever before. Photography deserves respect, its presence and influence in the art world in equivalent to the other forms of art.
-
-
-
8 IMPORTANT Composition Tips for Better Photos -
How to Shoot Manual in 10 Minutes - Beginner Photography Tutorial -
Guide to Basic DSLR
-
-
-
It's a good idea to test ourselves from time to time. If you've watched all the contents, you might be surprised how much knowledge you've already acquired.
At the end of the quiz, we'll provide you with an instant score – plus a list of any questions you missed this time around.
-
-
-
Opened: Tuesday, 17 October 2023, 12:00 AMDue: Tuesday, 24 October 2023, 12:00 AM
Lab Activity:
Activity Outcome: Shot the various types of shot.
Learning Outcomes: CLO1P
This Lab sheet encompasses of activities which is 1.
By the end of this laboratory session, you should be able to:
1. Identify the camera hardware and function.
2. Differentiate the basic shot types.
3. Explain the camera functions.
Duration: 3 hours
-
Opened: Wednesday, 18 October 2023, 12:00 AMDue: Wednesday, 25 October 2023, 12:00 AM
Lab Activity:
Learning Outcomes CLO1P
This Lab sheet encompasses of activities which is 2.
By the end of this laboratory session, you should be able to:
1. Identify the camera hardware and function.
2. Differentiate the basic shot types.
3. Explain the camera functions.
Duration: 2 hours
-
-
-
Free e book for more understanding for this course. Download now!
-
-
-
Page
-
-
-
Feedback
-
-
-